


At this point, it has perhaps never been easier to record your iPhone or iPad screen. Whether you want to provide a tutorial, record gameplay, or back up some essential video data, screen recording is always helpful. These instructions will guide you through how to screen record on iPhones or iPads, Increase or change Control Centre settings, and much more. Continue reading to discover how you can get the best out-of-screen recording features on your Apple gadgets.
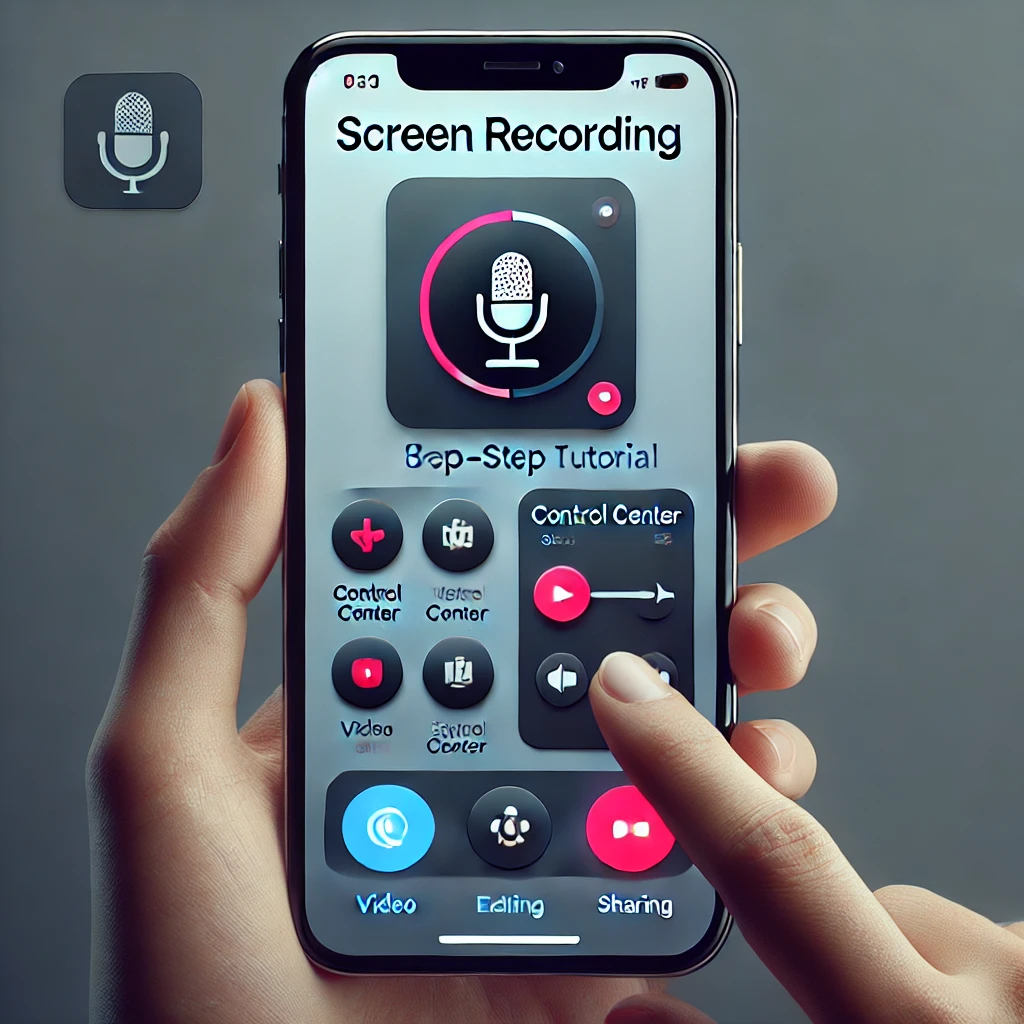
1. What is Screen Recording on iPhone and iPad?
Screen recording lets you record everything happening on the IOS device, especially the iPhone or iPad. In any context where you may need to showcase how an app works or generate content for your social networks – this one is indispensable. It comes with built-in support in iOS; therefore, anyone can capture the screen without third-party tools.
Screen recording is wonderful, and you should take one when you want to record a tutorial, a particular game, or show a friend how something works in an application. Moreover, capturing sound simultaneously with the screen makes the app extremely useful for videobloggers and other content makers.
2. How to Enable Screen Recording in Control Center
Before beginning screen recordings, you must include the screen recording icon in the control center icons. Here’s how:
Open the Control Center: Face ID users drag it down from the top right of the screen, while those with Home buttons swipe the screen up from the bottom.
Go to Settings: Your iPhone settings, then choose Control Center.
Add the Screen Recording Button: Look for ‘Screen Recording’ and then tap the sign ‘+’ right next to it. It includes the screen recording button on the control center.
You can take advantage of the screen recording feature from anywhere, anytime you open your control center.
3. Step-by-Step: How to Start Recording on iPhone or iPad
With the screen recording button added to your control center, starting a recording is easy:
Open Control Center: If your iPhone has a top right corner, it’s Swipe down from the top right corner of the screen; otherwise, Swipe up if your iPhone has a home button at the lower end of the screen.
Tap the Screen Recording Button: You will find a circular screen recording button and tap it.
Start Recording: Your iPhone or iPad starts recording your screen after a 3-second countdown—a colored bar at the top of the screen changes to red when you are recording.
You are now set to switch apps, visit any website, or perform any task you want to include in the video.
4. How to Add Audio to Your Screen Recordings
Want to capture sound in your screen capture project? Whether it’s background audio or your voice, here’s how:
Long-press the Screen Recording Button: When in the control center, tap and hold down the screen recording symbol to view additional options.
Enable Microphone Audio: You will also note an option to enable the microphone. Hit the record button on the microphone to start the recording process.
Start Recording: When the microphone icon turns green, you can press Start Recording and your screen recording will be accompanied by any audio the microphone picks up.
This is particularly useful when recording the lectures or a commentary on the gameplay.
5. Customizing Your iPhone’s Control Center for Easier Access
This stabilization of the control center ensures that screen recording and other features that you use regularly can be easily accessed. Here’s how to adjust your control center:
- Go to Settings: Go to your iPhone’s Settings app and tap Control Center.
- Customize Controls: The user can modify the controls of the control center, altering, removing, or changing the position of a particular power. Make sure it is one of the displayed list controls for screen recording.
- Quick Access: You can customize the buttons you arrange on the control center now that you swipe and record the screen effortlessly.
6. How to Stop and Save Screen Recordings
After you have made a screen recording on your iPhone or iPad, you can no longer record without stopping the action and saving the Video. Here’s how:
- Stop Recording: To stop recording it, you must again open the control center and tap the red screen recording button. Or, you can press the red bar on the top of your screen and choose to end the recording.
- Save Your Recording: After the recording, your taking on Video will be saved to your photos app, from where you can trim, cut, or share it from there.
FAQ
Can I screen record audio?
Yes, it would help if you switched on the microphone at the start of your recording.
Where can I find my screen recordings?
As aforementioned, all the screen recordings are saved to the Photos application.
How to Become an Electrician in California: A Complete Guide to Getting Your Electrical License
How do I screen record for longer periods?
If you wait too long, the app will pause for you to sing the next line, but there’s no time limit. Be sure to have enough space on your iPhone for the recording.
8. Common Issues and How to Fix Them
Here are some common problems users face while screen recording and their solutions:
- The screen recording button is missing in the control center: Open your device’s Settings and look for Control Center. Tap the green plus (+) sign to add the screen recording button.
- No audio in screen recording: Before starting the recording, the microphone icon will not be on the screen during screen recording unless the screen recording button is long pressed.
- Cannot save screen recordings: Your iPhone may not save your recordings if your storage is full or if the Photos app does not have permission to save videos.
9. Top Uses for Screen Recording on iPhone and iPad
Screen recording is incredibly versatile and can be used for a variety of purposes:
- Tutorials: Design tutorials for an app or an iPhone setting.
- Game Streaming: Record yourself while playing and post the video on YouTube or social platforms.
- Bug Reporting: Record a disoriented app or one that has crashed for displaying to the developers or customer care department.
10. How to Share Your Recorded Videos on Social Media
Most people would love to know how to share screen recordings withwith the world. After you’ve finished recording, follow these steps:
- Open the Photos App: Navigate the Photos app and locate your recorded video.
- Select the Share Button: Click the Share option, and then you will have the option to Share to any of the social network sites such as Instagram, YouTube, or Facebook.
- Upload Your Video: Follow the instructions to the site you are on to upload your video.
Roast Brussels Sprouts: The Crispy, Delicious Side Dish You Can’t Miss
Key Takeaways
- As for iPhone and iPad, the feature is as simple as possible – it is available within the Control Centre.
- To quickly access the screen recording button, rename the control center and change it according to your needs.
- Allow the microphone to record the voice while capturing the screen.
Recordings are saved in the Photos app and can be edited across Social Media. New social media networks are powerful tools that allow anyone to simply create interesting content or share important data.
iPhone Screen Recording
Screen recorder on your iPhone is an amazing and handy feature that you have on your iPhone, backed by Apple Support, that enables you to snapshot or record the screen on your iPhone . For iPhone, I will demonstrate on iPhone 14 and iPhone 13 or other iphone models how to screen recording on an iPhone and even record your iPhone screen on an iPod touch for older generations. First, include the screen recording button in control center and tap the microphone icon to record the audio. Here, we’ll show you how to upload original content, do a video on the fly screen, and use screen mirroring. With the new iPhone, for instance, the iPhone 3GS, you can tap the screen and take a screenshot of it; it will not give you a direct video of the iPhone, but it will help you record one. Check out our fully illustrated guide on how to edit your control center and discover how to record a video using the recording button in the control center. You can also check the Audio option, Which allows you to have a voice-over and share it with the world on YouTube.
Sometimes, recording and mirroring cannot be executed concurrently on apps, but the built-in controls in iOS 11 or newer versions guarantee proper performance. If you do not want all the recorded frames to be saved, look at the status bar at the top of the screen or the red bar to control the ongoing recording session. Additional information from CNET and other consumer technology sites contains helpful how-to articles that may prove useful. For affiliate opportunities, you can earn through the content shared within the program, and our newsletter is updated frequently with media types for recording and tips on how to record your screen or share your recordings with others easily.